How to Create a Professional Email Signature to Build Client Trust


Introduction
In today’s article, I will show you how to add an email signature that makes you look more professional to clients and helps build greater trust.
Practical Steps
1. Open Your Email Settings
First, open your email and click on Settings.
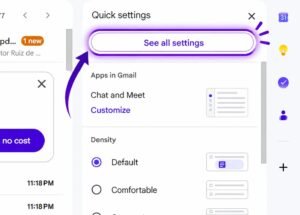
2. Go to See All Settings
After opening Settings, click on See All Settings, as shown in the image.
3. Find the Create Signature Option
Now, a page will open. Scroll down a little, and you will see the Create Signature option, as shown in the picture.
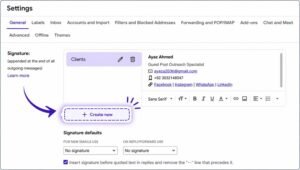
4. Select a Signature Name
First, select a name for your signature. You can choose any name, such as Client, as I have used in the example.
5. Paste Your Signature
After selecting the signature name, a box will appear. Paste your professional email signature into this box.
6. Save Changes
After adding the signature, scroll down and click on Save Changes.
7. Check Your Signature
Now, your signature will be saved in the email Compose section. Whenever you compose a new email, your professional signature can be used.
Questions & Answers
Q1. Why should I add an email signature?
An email signature makes you look more professional to clients and helps build greater trust.
Q2. Where can I create an email signature?
You can create an email signature from your email Settings by going to See All Settings and finding the Create Signature option.
Q3. Where will my saved signature appear?
After saving the changes, your signature will be saved in the email Compose section.